A New Smile With Direct Veneers
One Patient’s View of This Cosmetic Procedure
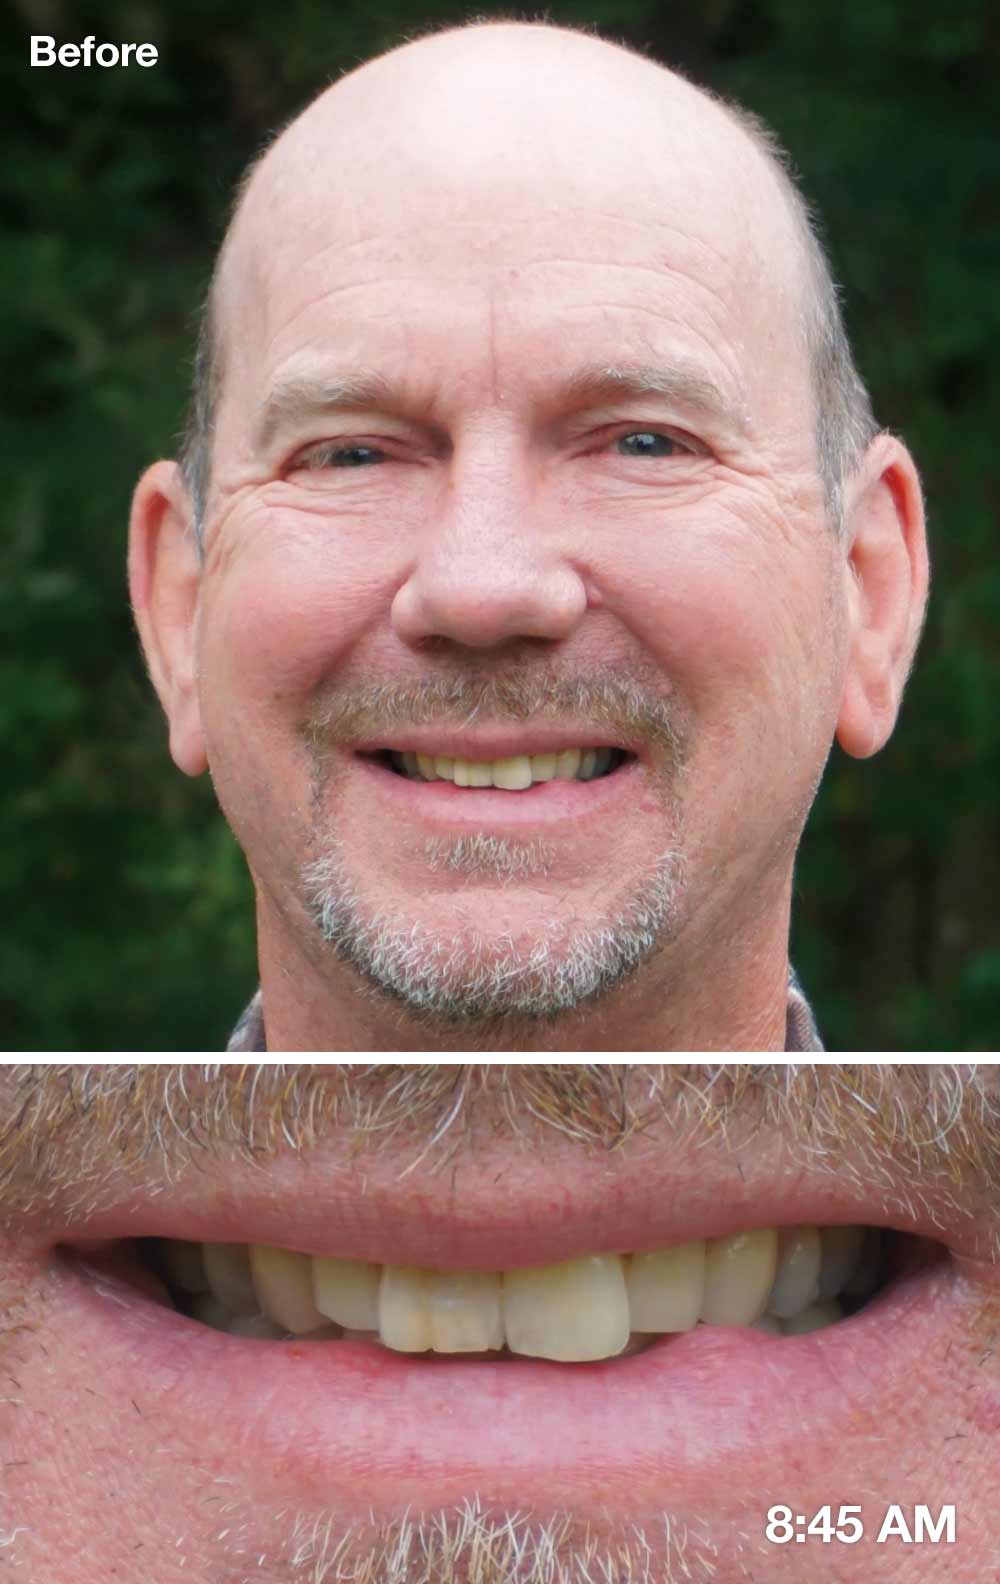
I know the world has much bigger issues. But a significant source of discontent for me, over the last few years, was the appearance of my front teeth. I’d had braces as a teenager (some four decades ago), along with a few whitening treatments more recently, but I still noticed problems with my smile. One of my front teeth was stained, especially in a vertical crevice my dentist called a craze line. The other had a small chip on the bottom. And while those long-ago orthodontic treatments were successful, both front teeth had now moved forward and rotated out of alignment. Unfortunately, this made them even more noticeable—and it didn’t make me feel like smiling. What could I do about my smile problems?
I pondered the question for a few years. One suggestion was to go for orthodontics again. This method would require perhaps 18 months of active treatment, either with braces or clear aligners. (I’d had friends who went both routes, and I heard pluses and minuses about each.) Following that, my teeth would need additional whitening treatments. Ultimately, though, I wasn’t sure if I wanted to go through lengthy dental treatments at this point in my life; I couldn’t help recalling Danny Glover’s line from Lethal Weapon: “I’m too old for this [sort of thing].”
So when my dentist mentioned an alternative during a routine exam, I was intrigued. He said that tooth reshaping and cosmetic bonding, also called direct veneers, would only require two appointments to get results. In his opinion, this treatment would be effective and appropriate for the problems with my teeth. It would involve removing a couple of millimeters of enamel from certain areas on the affected teeth, and then covering the front surfaces with a tooth-colored composite resin. Composite material would also be added to nearby teeth to give the smile a pleasing arc, and to make the teeth evenly light in color.
Direct veneers can produce dramatic, positive changes in a short period of time.
My dentist—we’ll call him Dr. E—explained that this method isn’t as conservative as orthodontic treatment: Once prepared, the teeth would always need to be covered with some type of veneer. And it isn’t as long-lasting as veneers made of porcelain that come from a lab: In time, the composite material might pick up stains and/or need to be replaced for another reason. But he said the new nano-hybrid composite materials were natural-looking and durable, and could produce dramatic, positive changes in a short period of time. Direct veneers—so-called because they are applied directly by the dentist—are also less costly than the kind made in a lab. So I decided to give them a try.
Modeling a Trial Smile
The first step was quick and simple: I came into the office for a brief consultation, and had a model made of my teeth. This involved holding a tray full of putty-like material in my mouth for 30 seconds. After it hardened against the upper arch of teeth, the mold was released and the tray came out. An exact replica of the teeth, cast in plaster, would then be prepared. Dr. E would use it to make a “wax-up”, or model, of his proposed changes to my smile. I couldn’t wait to see it.
Having the model would let him try out a few different ways he might reduce or augment various teeth to get the pleasing affect we were looking for. Best of all, I wouldn’t have to sit in the chair while he tinkered with it. Dr. E promised he would leave one side of the model “as is” and modify the other, so I could have a “before-and-after” view. But right off the bat, he said, it seemed clear that the front teeth would need to be reduced (have surface material removed) to make them align with the rest of my smile—especially on the distal edges (the ones farther away from the center of the smile). The surfaces of the adjacent teeth would need to have some composite material added so they would match up. To make the smile look even and the color match all the way across, he recommended that a total of six teeth get treatment.
We also talked about what shade the teeth should be. I didn’t want a smile that looked unnaturally white; Dr. E said that in his experience, since we were changing all six of the prominent front teeth, we could go with a very light shade without having it appear fake. He also pointed out that there was often a natural variation in color between top and bottom teeth, and he thought the lighter color would work well for me. I agreed, and we arranged to meet again in a few weeks, when I’d be getting a new smile.
Treatment Day Arrives
I arrived at the dental office early on treatment day. Dr. E had blocked out three hours for the procedure, but said it might not take quite that long. First, he showed me the completed wax-up. On the untreated side was my familiar, flawed smile—but the bonded side was drastically improved. The front teeth were no longer askew: they had been contoured to align with the adjacent ones. The bottom edges were rounded and free of chips, and the whole smile had a pleasing appearance.
 |
| I was not happy with the way my two front teeth had rotated, and the noticeable cracks and stains. |
 |
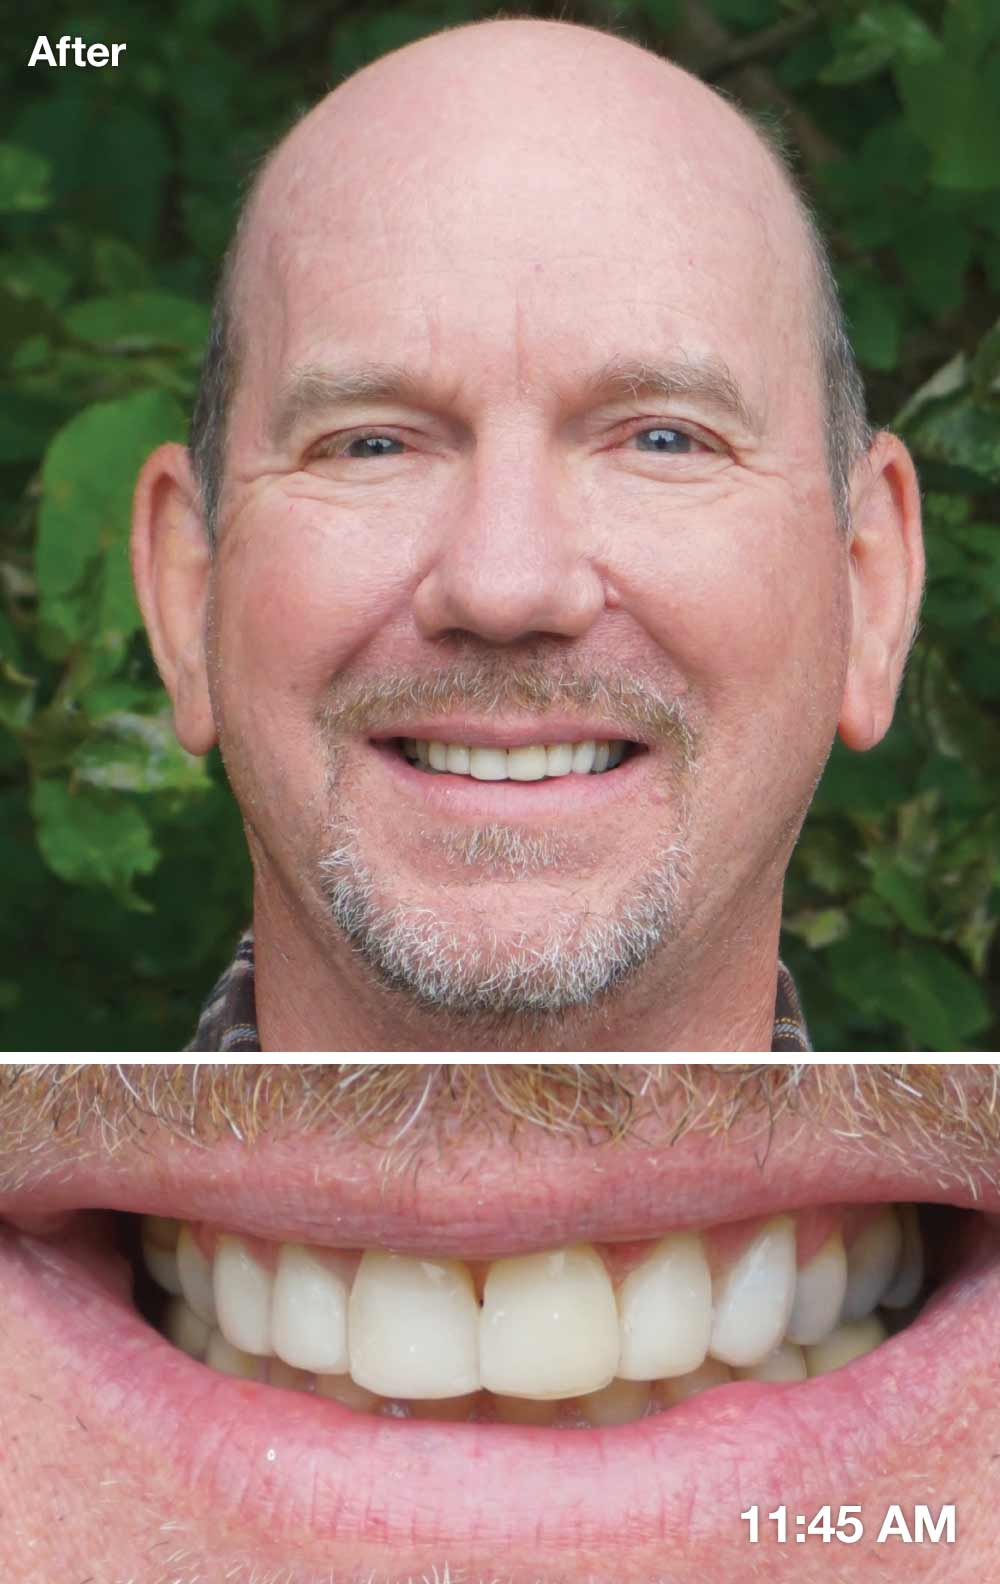
| Direct veneers gave my teeth a straighter, whiter and more youthful appearance. |
Dr. E said that first, he would do the part of the procedure that might cause the most discomfort: preparing and contouring the surfaces of the front teeth with a drill. It would take, he thought, perhaps fifteen minutes to remove one or two millimeters of enamel in the right places. He said that since most people don’t experience pain during this step, he didn’t usually recommend an anesthetic—but if I started to feel uncomfortable at any point, he would gladly provide a numbing shot. I agreed.
Soon the whir of the dental drill blocked out the soft music that played in the background, and I felt a good deal of vibration in my jaw—but no actual pain. While I wouldn’t call it comfortable, I’d suffered more distress just sitting in the seats at certain movie theatres. After several rounds of drilling and rinsing he finished, and we took a break.
“I shouldn’t look now, right?” I asked, curious about exactly what he’d done.
“No, you can look,” he said. “It’s nothing upsetting.”
Gazing in a mirror, I noticed that my front teeth looked a bit smaller and more rounded; they were also darker in color. That was because, with much of the enamel gone, I was seeing the dentin layer that’s normally hidden under the tooth’s surface. But there wasn’t time to linger: Now it was time to do the bonding.
Team Bonding
I sat back in the chair while he applied an etchant and a bonding agent to the prepared teeth. These substances help the composite resin adhere to the tooth. Finally it was time for the bonding material itself. The dental assistant prepared this putty-like substance in small batches, and Dr. E applied it to the teeth with a tiny spatula-like tool, a little at a time. In between applications, the newly deposited material was cured (hardened) with a violet light.
While tooth preparation was slightly uncomfortable, this procedure was somewhat boring. But the next step was less so. Using both hand-held instruments and the drill, Dr. E shaped and polished the restored tooth. I couldn’t see what he was doing, but I could sense it: The tooth was getting smoother and more sculpted with each pass. In addition to shaping the surface, Dr. E also worked an abrasive strip back and forth between the front teeth to ensure I’d have enough space for proper cleaning.
Finally, the two front teeth were done and we took another break; the process had taken a little over an hour so far.
“I think you should wait until we’re all done before you look again,” Dr. E said. “It’s better that way.” I agreed not to peek.
A few minutes later, we went back to the chair to do the other teeth. These needed far less preparation because only a little enamel had to be removed. The lateral incisors (the ones next to the front teeth), however, would need considerable bonding material added to them; the canines (eyeteeth) would require only minor adjustment. By now I was used to the sensation of tooth preparation and the routine of adding bonding material, curing, and polishing. The time went by uneventfully.
The Reveal
Finally, after about two and a half hours in the chair, it was done. Like a good scout, I’d kept my word not to peek until it was all over. Now it was time for the big reveal.
And I had to admit it was worth the wait: Gone were the wonky teeth up front; in their place was a nice, even smile with a smooth curve. The teeth were free of chips and consistent in color—and just a shade lighter than they’d been. It was a smile I’d be happy to show off. And it was all done in one morning.
“A lot of times, people will say ‘You look good,’ but they can’t put their finger on exactly what it is,” Dr. E’s assistant said about the procedure. I think she’s probably right—except in the case of my brother-in-law, whose candor is legendary. He came right out with it:
“Dude—you got your teeth fixed? Nice!”

